Trend Lon controllers typically installed in “Trend” mode which self-install on a Lonworks system and use standard Lan / outstation numbers as any of the other Trend modules. Devices are typically software addressed with an LCI and IQLtool built into SET. This works well but requires a Trend 3Xtend or the newer Xtend module to route Trend Lon devices on to Ethernet or current loop networks.
Trend’s default addressing scheme on Lon translates as follows:
Domain Table = 1
Domain Length = 1 byte & ID 255 or FF hex
Subnet = 255 – Trend Lan number (1,4-119 are valid Lan numbers)
Node = Trend outstation number (1,4-119 are valid outstation numbers)
Message Code = 64
Domain Wide = domain wide
Router Buffer Size = 146 bytes
If the IQL has the above settings, it will still communicate with the Xtend and the standard tools. This is the case, even if its Lon managed.
Consequences of switching to Lon managed
The IQLvav datasheet has all the points listed that convert directly to SNVTs. The main points that will no long be available are:
Airflow setpoints including K factor
Velocity pressure input and the ability to zero it
Damper, hot water positions and electric heat outputs
Alarm input
Damper override settings
The airflow setpoint is also a temp SNVT which cannot be directly converted within the point setup in Niagara. Connect a multiple block and multiply this reading by 2.119 to convert to cfm.
Pulling the IQLvav into Niagara
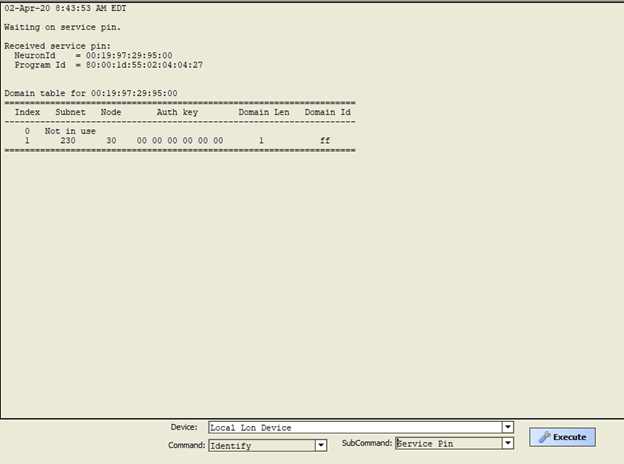
The easiest way to bring these in first figure out how the controllers are addressed and setting the Jace Lon domain length and ID to match the existing controllers. In most cases it will be the defaults from above. To verify this, right click on the Lon network and choose Lon Utilities view, then pick identify and hit the service pin on one of the modules.
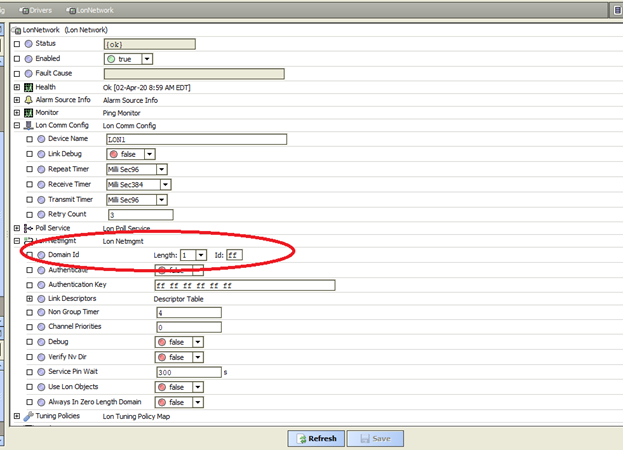
In this example the IQLvavs subnet is 230 which is Trend Lan 25 (255 – 25 = 230) and Outstation 30. We can see the domain length is 1, domain ID is 255 which is what we need to set the Jace for in order to discover the rest of the devices. Right click on the Lon network, open its property sheet and expand the Lon Netmgmt. Set the domain length and ID to match what was discovered with the service pin.
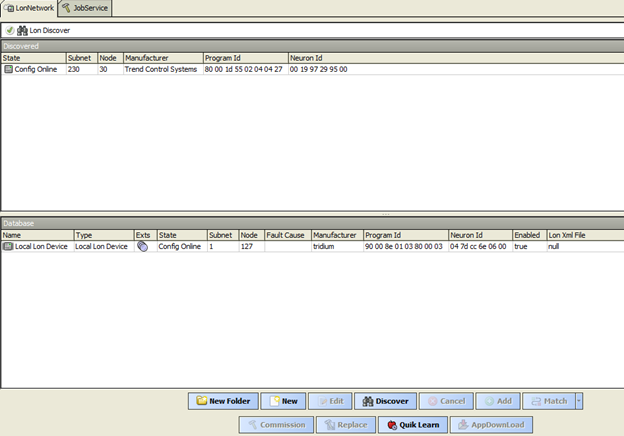
After saving this, you should be able to open the Lon network and discover the IQLvavs.
At this point you can drag in the discovered devices. In order to get all the point names, you need either the devices XIF file or already converted an XIF into the LMNL format that Niagara uses. XIF files can be converted under Tools – Lon XML Tool. Links to both formats below.
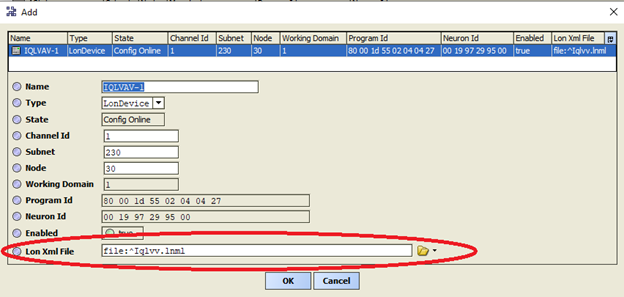
When you drag the device down into the database, assign the attached LMNL file in the add window.
You can now import points, readdress and commission the devices as any other Lon device. Keep in mind if you change the domain length or ID from the default, they will no longer communicate with the Extend, LCI, SET, etc. IQLtool will not be able to address IQLs that have been Lon managed unless they are switched back to their default mode.
Returning a Lon managed IQLvav back to its default Trend mode
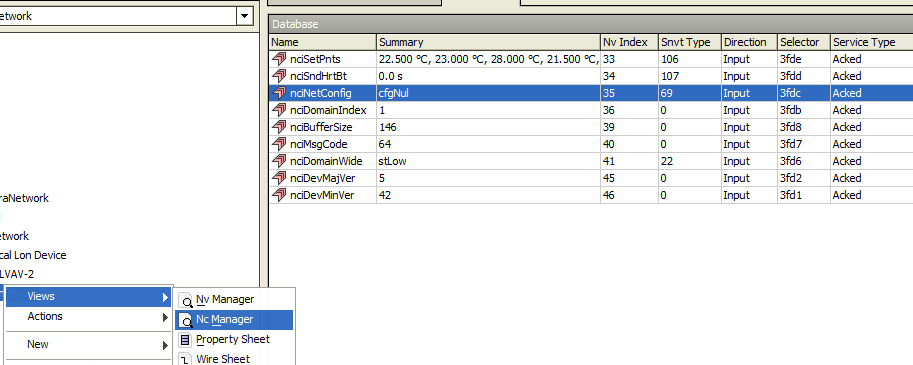
If you have changed from Trend’s default addressing and need to adjust the settings that are no longer available, you will need to restore them in order to connect with an LCI & SET. Change the domain length back to 1 and the domain ID back to FF if these have been changed. Upload the device by right clicking on the device Actions – Upload. Then select the nc Manager view. In that window change the nciNetConfig to cfgNul. Then download the change by right clicking on the device Actions – Download.
At this point the IQL will reset and will communicate with the standard Trend tools. Note that the address will default to Lan 1 Outstation 1.
Additional notes
Never change nviSecurityCode under any circumstance. This is a copy protection scheme that is used with nvoGenerator. If the security code is changed from its factory value the controller will cease to process it program. It will still communicate, but nothing will function. These controllers are no longer supported, so don’t expect factory support to recover from this.
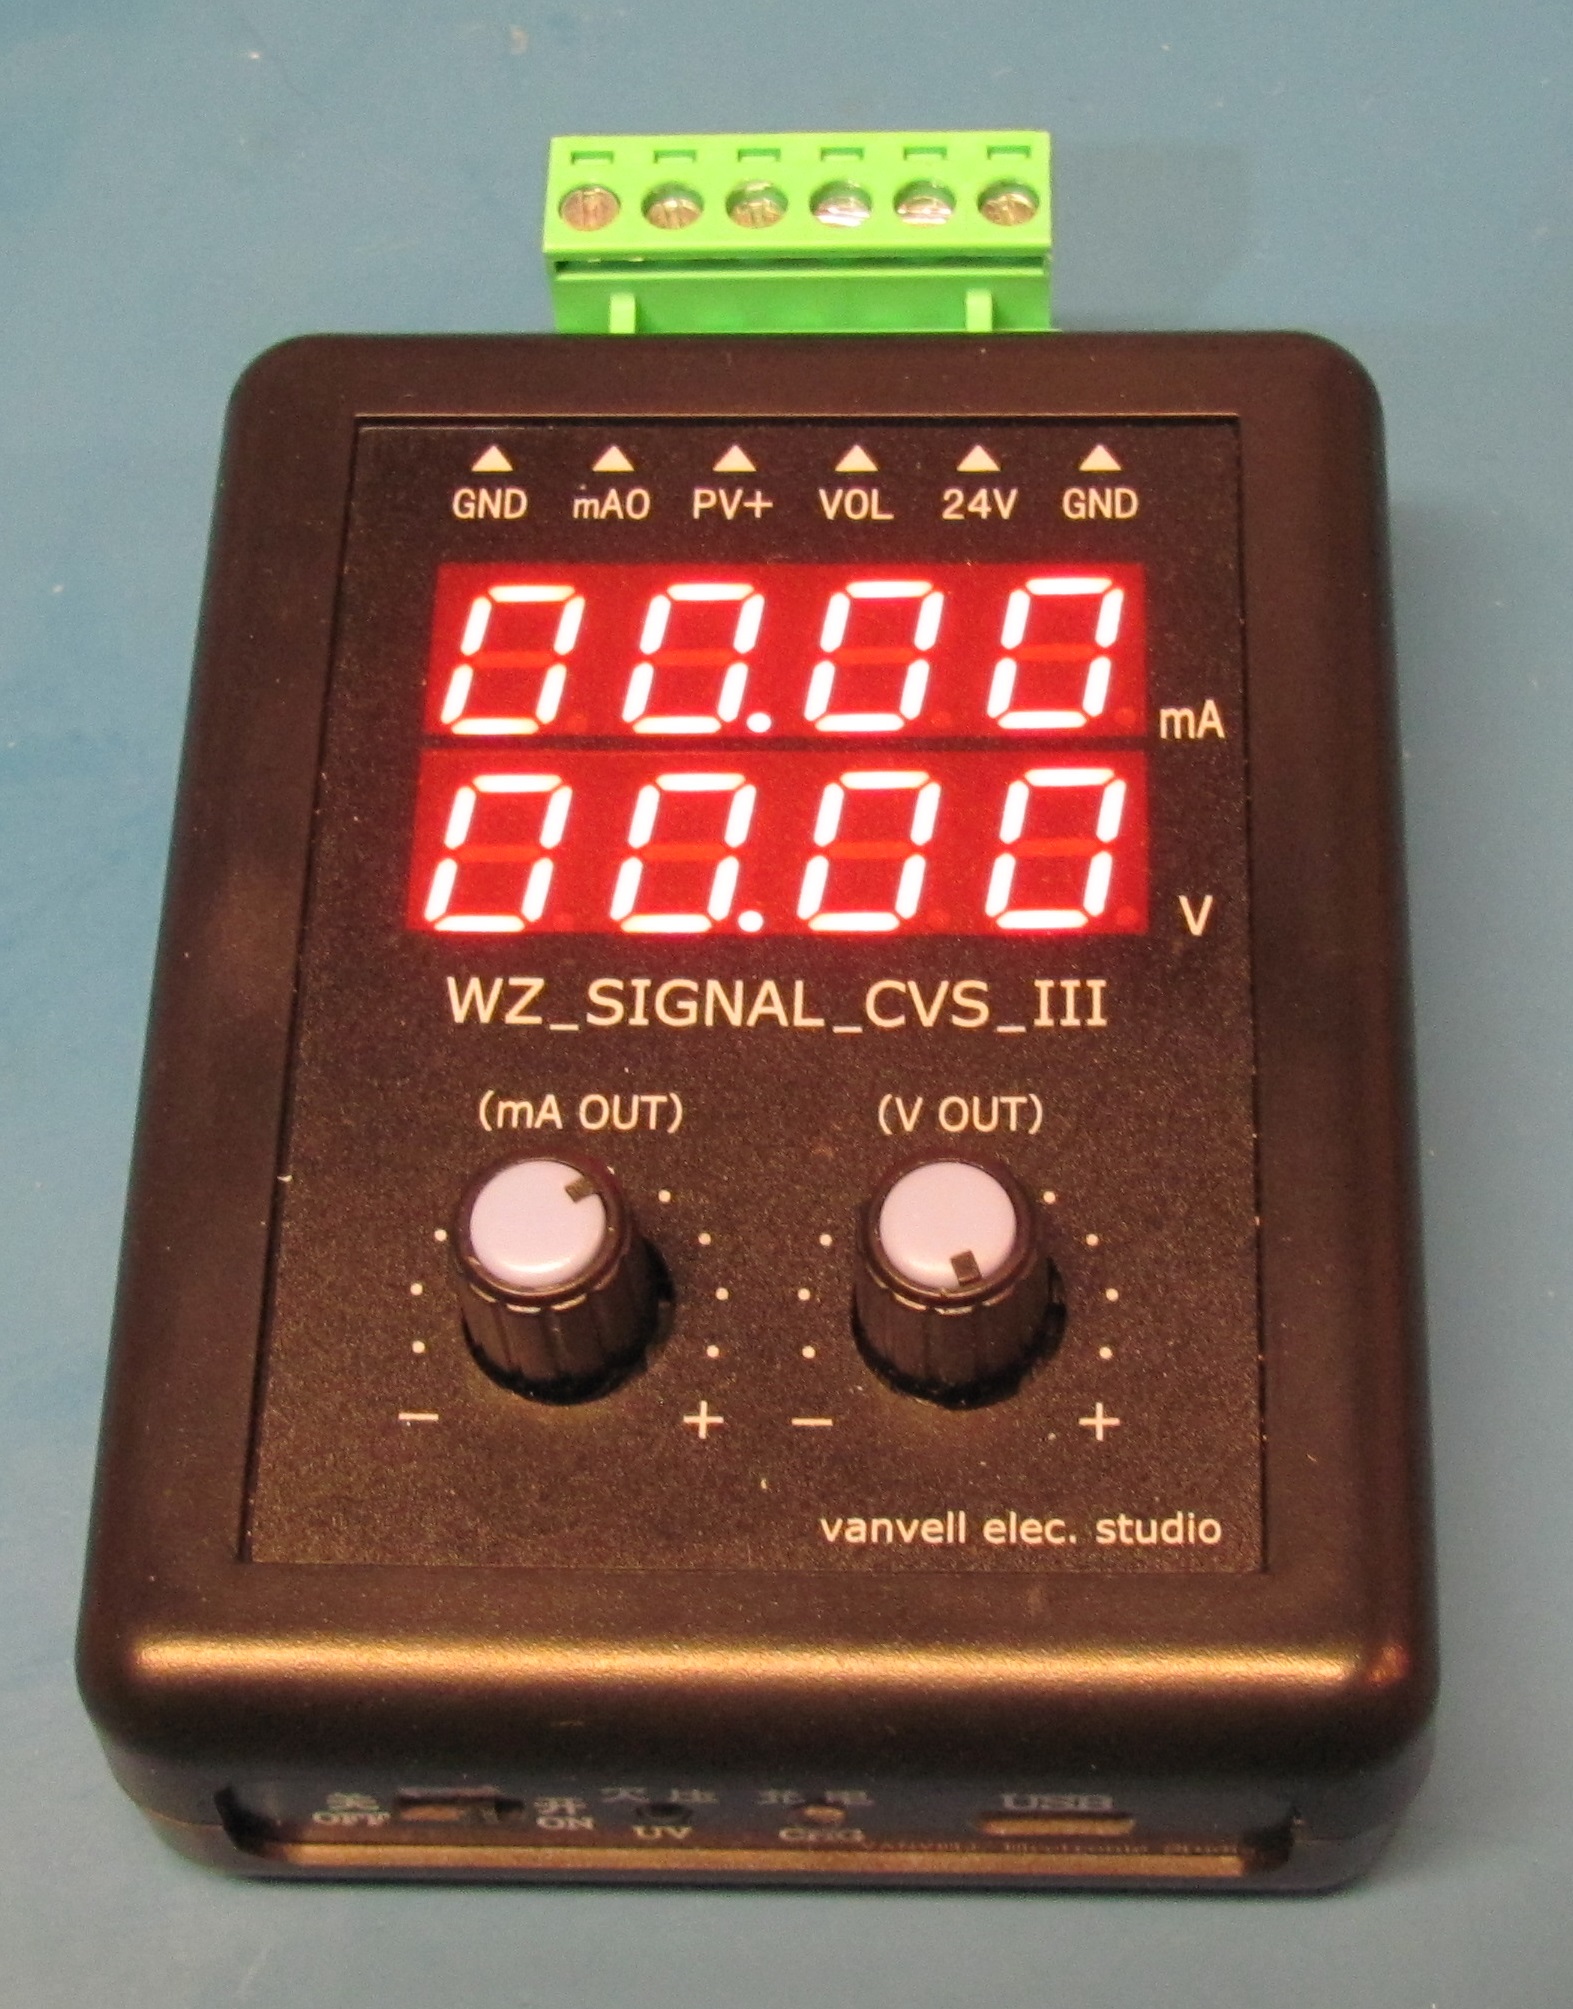
I recently needed a handheld signal generator to supply 0-10vdc signals to setup some analog controllers. In the past I have used everything from a 9v battery to the Kele ASG. In this case I borrowed an ASG and got the job done but was not terribly impressed with it. It only has a LED bar graph to show the current output and its limited to 1vdc or 2ma steps. A bit of looking around on Ebay, I found a large selection of low-cost signal generators marketed for PLC/HVAC controls market. This is a quick look at one of them, the WZ Signal CVS III. This can be found on Ebay for between $25-30 delivered.
What I don’t like about the Kele ASG:
High cost ~$100
Only course adjustment of generated signals
Uses a 1/8” headphone connector for leads / pain to field replace
Bar graph display does the job, for the cost would expect better
20ma/10vdc max output doesn’t allow testing outside normal ranges
4 button interface not user friendly
For an instrument I rarely need its likely lost or the battery leaks destroying it before I need it again. For the cost, would expect better control of the output signals and something simple enough to pick up and use without hunting for manuals. Using the 1/8” phono jack for the test leads means losing the leads or developing a broken conductor at the jack requires a soldering iron or new set of leads.
What I like about the CVS III:
Low cost – $25-30 delivered
USB micro rechargeable battery
Standard terminal block interface to test leads / easy to replace
Fine adjustment of output signals
Digital readout display
24vdc output to power low current devices
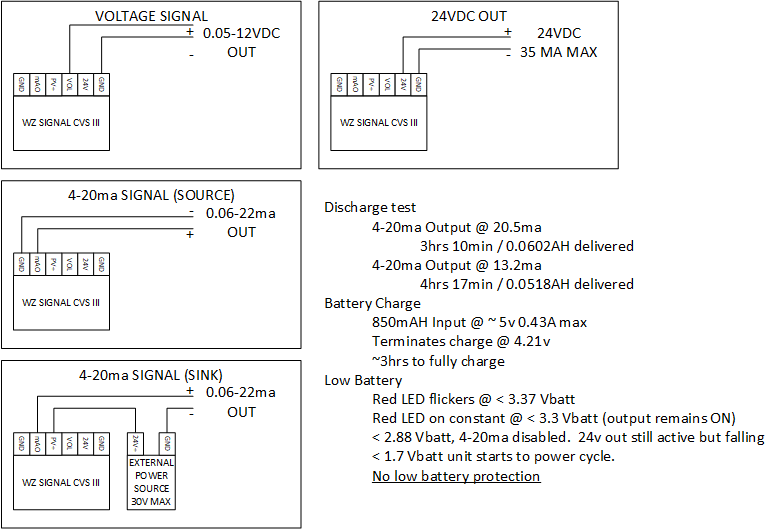
Being impressed with such a low-cost generator, I did some tests to see how it preforms. The unit can supply a 20ma signal for little over 3 hours on a full charge. Under ~13ma signal just over 4 hours. Didn’t bother testing voltage signals but it would be much longer. Powering the display and boost converter would steal more power than the voltage output.
Accuracy of the output I checked against my Keithley 2000 bench VOM and it was more than enough for anything I would require.
While testing how long the battery would last, I did notice the unit has no real low battery protection. The unit will disable the output signal when battery voltage falls below 2.88v, but the 24v output and display continue. Being the case the, there is still load on the battery and its voltage continues to drop. At ~2.7 Vbatt, the unit starts rebooting and will continue to load the battery until switched off. This of course will damage the internal lithium battery given it’s a bare non-protected cell. The unit does appear to have a charge controller so overcharging shouldn’t be an issue.
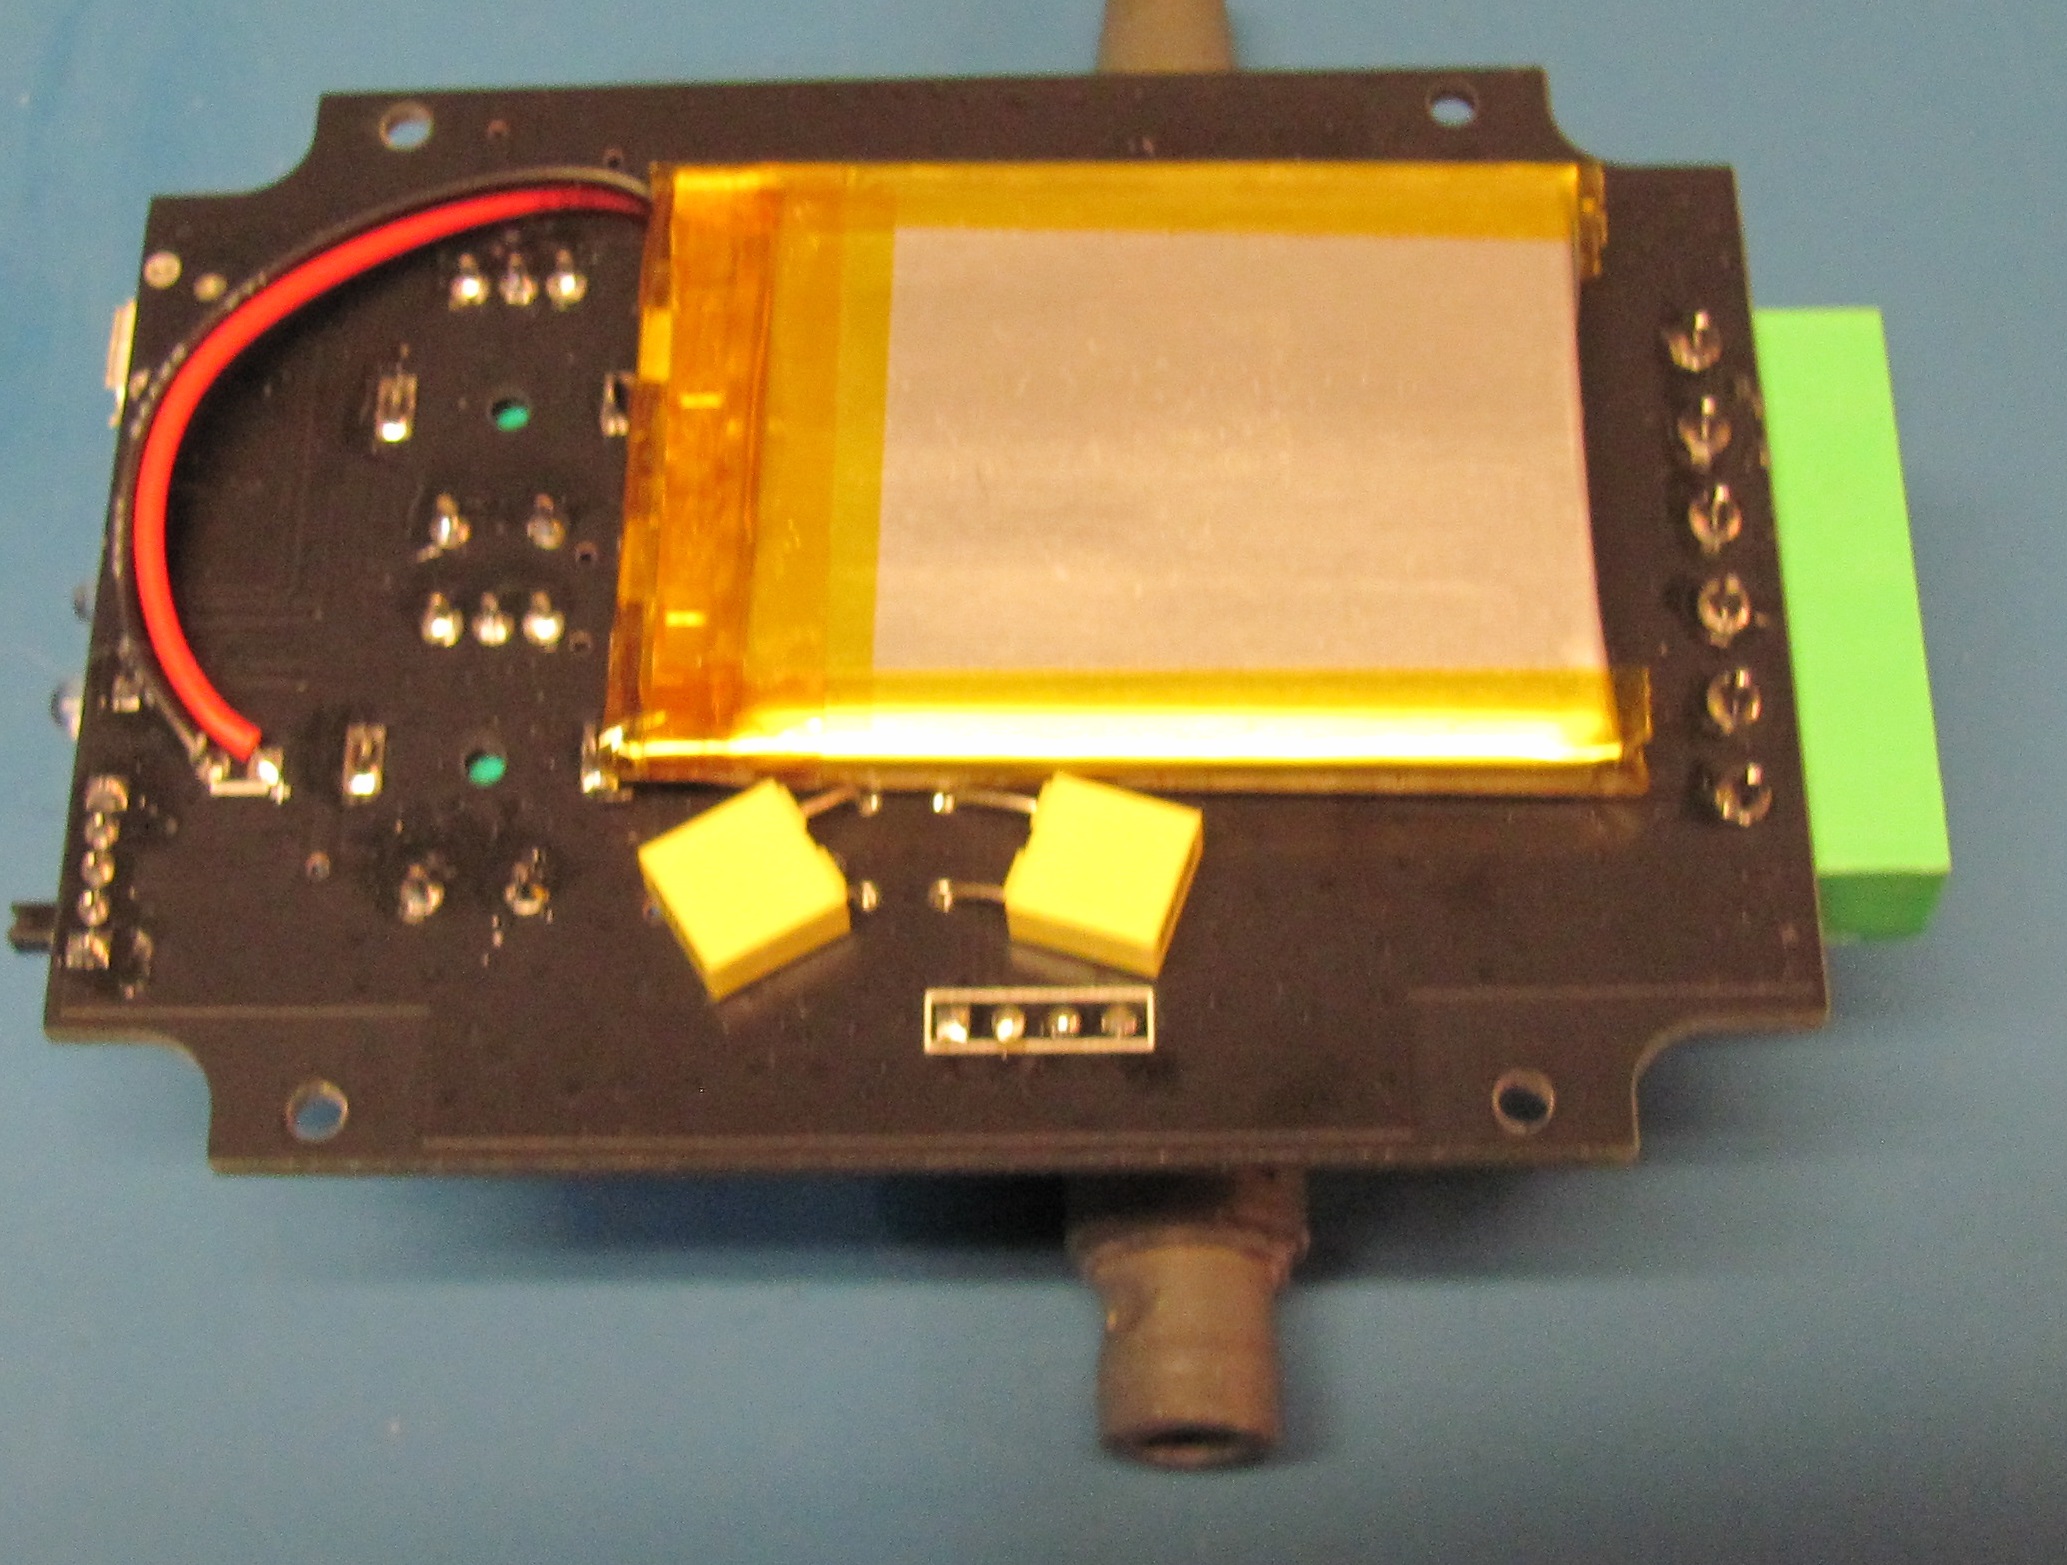
A look under the hood, it’s a well constructed unit. As typical with such low-cost devices from the usual parts of the world, all the IC part numbers have been sanded off. Being the case, I’m not going to bother diving into the design. From a quick glance it’s what one would expect. Boost converter, processor driving the output and display and charge IC, nothing special. The I/O terminals do appear to have at least diodes protecting them. All through hole parts have been hand soldered. I would note that the battery connections are very close together. Seems silly given they are hand soldered and space isn’t a problem. Also near the battery pack are the through hole headers to the display. If the battery pack is misaligned these could puncture the cell.
All in all, its hard to complain about such a low-cost item. The lack of low battery protection is a miss. That said, it’s easy enough to either replace the cell or just purchase another. No directions are included with the unit. The Ebay listing shows the wiring connections and terminal labels are far from clear. Below is how the unit should be connected in various cases and some of my test results.
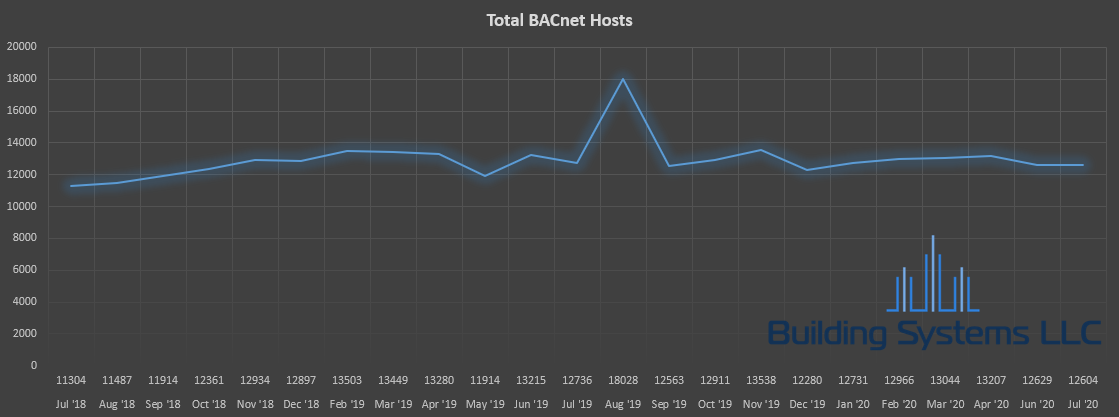
Ever wonder how many BACnet systems are exposed on the internet? This is an ongoing project to analyze BACnet hosts found in the Shodan database. Each month, results from Shodan hosts with port 47808 will be analyzed. Monthly reports will analyze results by vendor, device model and location.
While the BACnet standard allowed for some basic level of security, nothing on the market today supports it. I’m told the BTL testing labs have also never certified a device supporting this to date. If someone can discover a device, they can start commanding objects and changing settings with freely available BACnet tools.
Results of exposing devices could range from annoying to real damage. Turning the heat off in during a winter holiday weekend, to downloading corrupt firmware / program files bricking devices.
If remote access is required its extremely important to either use VPNs or more secure protocols to transit the public internet.
Report Details
Shodan’s report contains the IP address, banner, timestamp, host name, and location based on the IP address. For BACnet hosts that respond, the banner will contain the instance, object name, device location, vendor name, BDT table, application / firmware version, device model and name.
Our scripts parse Shodan’s banners to do some basic classification on the host. Hosts that responded with valid responses are considered BACnet devices. Unknown hosts are hosts that either have invalid BACnet responses, BACnet error messages, or empty banners. Hosts that reply with a BACnet error message are considered Unknown / Suspected BACnet devices.
After classifying the hosts, they are sorted and the occurrence each vendor and device model is calculated. Since some control vendors have identity crises requiring additional filtering. Honeywell for example uses “Honeywell”, “Honeywell International, Inc” and “Honeywell International Inc.”. Vendor names reduced to alpha numeric characters with spaces removed when calculating vendor totals. Additional rules look for the first occurrence of a vendor known to use multiple different names and all further occurrences of any variation are counted together.
There are several other actors constantly scanning the internet for BACnet devices. Using honeypots we regularly see scans from the following organizations as well as other unidentified sources.
Secure Connect (BACnet/SC) may solve the security issues surrounding BACnet and is currently working through the approval process. SC uses TLS between devices, eliminates the need for BBMDs and static IPs. Final approval is expected to happen sometime in late 2019. How long it takes for manufactures to implement and release products supporting it, is anyone’s guess. It will likely be many years yet before we see widespread adoption. SC could also turn into another form of vendor lock in.
Tridium released updates for the Niagara AX & N4 platforms this week that patch security vulnerabilities, including critical JVM vulnerabilities. Without mention which versions of AX/N4 are effected, one can only assume all prior versions. When asked for more details, Tridium said Windows based hosts are at the highest risk and they are not aware of active exploits in the wild currently. That being the case, at a minimum all Windows based supervisors and soft Jaces should be patched as soon as possible.
This brings AX to version 3.8.401 and N4 to version 4.4.92.2.1. Vykon branded platforms have this available now, third party channels will lag behind to vary degrees. Unfortunately without any further details, there is no mitigations other than patching. If your channel is behind the current release version, waiting or switching brands is the only option. If this is the case, please help move the industry forward and make your concerns known to the vendor. Customers shouldn’t have to wait months for critical security updates.
Official ICS-CERT announcement. Disabled accounts seem to be central to this bug which may allow for remote code execution. The CVE links seem dead as of today.
8/30/18 Update
Scanning on the open internet for exposed Tridium system increases.
Coincidence, I think not. If you must expose your system to the internet, its past time to update.
Recently I had a need for a small portable device to preform long term
BACnet captures and figured the Raspi might be well suited. Using the
raspi network tap described below you can capture months of traffic,
remotely access Wireshark and download the captured traffic. I decided
on a passive tap but any switch or hub could be used depending on your
needs.
$160.29 total cost per unit in my setup, cost was not a huge concern. This could be done for half by making a passive tap and sourcing cheaper parts.
Update, I decided to roll my own tap. Its available at the bottom of this post.
Install Raspbian and update
Download the current version of Raspbian and install it to the SD card. On Windows I use Win32DiskImager
to copy the image to the card. Connect Ethernet, keyboard, mouse and a
monitor and boot it from the SD card. It should load right into the
desktop with the pi user account. Open up a terminal window and update.
Set the resolution. If your planing on using the pi headless, VNC will have a very small desktop once the monitor is removed. The largest option is best. Make sure whatever setting you choose is compatible with your monitor.
Under interface options enable VNC server.
If you want to check the DHCP address assigned to the raspi use the following in the terminal.
ifconfig
Exit the config menu and reboot the device.
sudo reboot
At this point you should be able to disconnect the keyboard, mouse and monitor and access the pi over VNC. On Windows I use RealVNC. VNC into the pi using the default user account – pi/raspberry.
Install Wireshark
Open a terminal window install and setup Wireshark.
sudo apt-get install wireshark
Part of the install will ask a few questions.
Choose the default – NO and then create a new user group.
Create on bash script per network interface you plan on using. There are several options depending on how you want to capture. A dedicated interface for the capture and a secondary for remote access is recommended. You will need a network tap or switch that supports mirroring or span ports for most networks such as this. These duplicate traffic on multiple ports to a single mirror port. Connecting the Raspi to a mirror port allows you capture all the traffic. Most cases these ports are one way, so they cannot be used to remotely access your Pi. Passive taps are another option for traffic capture. These can be homemade for a few bucks or purchased online. These do not require any power but separate monitoring interfaces are needed to capture the transmit and receive streams separately. You can combine the capture files later if desired. Passive taps steal some of the signal from the monitored cable. As such, Gigabit links will downgrade to 100mb and cable runs pushing the distance limits may not work. These taps are totally transparent to the monitored network. Connecting the Throwing Star with “OUT” to the monitored device, TX is traffic transmitted from the OUT port, RX is traffic received from the IN port.
Auto start Wireshark
Create a folder for the captures and a bash script for each capture interface to start Wireshark at boot up. In a terminal window:
#Set the nic to promisc mode sudo ip link set eth1 promisc on
#Fire up WS, rotate the logs every 24hrs wireshark -i eth1 -k -b duration:86400 -w /home/pi/Desktop/captures/WS_TX
Save the file and close the editor
Edit the LX autostart file to add the above script. This is located in
/home/pi/.config/lxsession/LXDE-pi. In a terminal window:
At this point the Pi is ready to go. Reboot and should launch Wireshark and start capturing.
Additional tips
Its best to use a capture filter with Wireshark to limit things to the traffic of interest. This results in smaller capture files and reduces the chance of capturing sensitive traffic. To see all the Wireshark command line options use the following:
wireshark -h
For capture filters, add them to the capture bash file created above. To monitor only BACnet traffic use:
Below is an example to capture multiple protocols.
wireshark -i eth1 -k -f 'udp port 47808 or udp portrange 67-68 or udp port 53' -b duration:86400 -w /home/pi/Desktop/captures/WS_TX
captures/WS_TX
This will include BACnet, DHCP and DNS traffic.
Adding BACnet specific coloring rules helps when reviewing. Optigo has videos on using Wireshark with BACnet. See the resources section of this site. Here is a link to Optigo’s Gdrive coloring rules.
See here for some basic information on securing the Raspi.
You can retrieve captures with VNC, FTP, SCP, or Samba. Information is available online covering this setup.
8-10-18 Update
After using several of these Raspi network taps in the field, I thought it was time for a quick update.
Construction
First lesson was the construction of the setup. Originally, I used 3M Dual Lock Velcro to attach the USB nics and the GSG tap to the case. Normally this Velcro has very good adhesion to just about anything and this was no exception. As always, the weakest link is the point of failure. In this case it was the stickers on the bottom of the Ableconn USB to Ethernet adapters. Both stickers peeled right off in short order, leaving the adapters flopping in the breeze. I sanded the bottoms with emery cloth and used a 5 minute epoxy to glue them to the case. This held extremely well, in fact I destroyed the USB adapters when I tried to remove them for the second upgrade.
Custom tap replacing the GSG Throwing Star
Second area for improvement was the GSG throwing star and the unwieldy cable management issue it created. With the patch cords leaving in four different directions, it was a pain to fit in the typical 6-8” deep control panel. Being there is little too a passive tap, I created my own. This custom tap eliminates two of the patch cords and has the remaining cables exiting in the same direction as the onboard Raspi Ethernet port. This slides into the adapters and has just two female ports for the IN / OUT connections of the cable to be monitored.
To glue the USB adapters, I found it best to have a 10” piece of masking tape ready. Spread the epoxy on the bottom taking care not to get to close to the front end with the RJ45. Put the masking tape on the back side of the case leaving enough to wrap over the top to hold the adapters in place. Stick the adapters on the top of the Raspi case with one hand, while carefully installing the tap with the other. Wrap masking tape around the adapters once your happy with the position of everything. When the epoxy starts to set, remove the tap so it doesn’t get permanently glued in place.
Custom Taps for Sale
To recover the cost of these, I made a handful of extra to offer here. I will ship these USPS Priority mail in a small flat rate box, for $30 + shipping anywhere in United States. Any orders outside of the US will be canceled and refunded. Sorry international shipping costs more than these are worth. Current stock will ship next business day. If you’re interested, get one before they are gone with buy now link below.
Future upgrades
Not sure I will ever get to this, but it would be nice to add MS/TP capture to this setup. Shouldn’t be too difficult but I have other projects that need attention.
Yet another way to export Niagara histories, this time with a program object. This object will convert every history within a station to a individual CSV file. In AX, these are located in the historyExports folder under the station home directory. In N4, these will be located in /shared/historyExports/ under the station home. Keep in mind, running this on a Jace may cause the station to run out of disk space. Depending on the number and length of the histories this process can take a few minutes.
When the object is executed, it locates all the histories within the station its ran on. One by one these are converted to CSV and saved as individual files. File names will be the history name with special characters escaped. If their are histories from multiple stations, individual folders are created per station under the export folder. Each CSV file will contain the timestamp and value of the full history time frame. Values are just the numeric portion, no units. This makes it easy to use within excel if you need to preform math functions on them. The status slot of the object will display the current history being exported as it runs. Once complete it will contain a total number of histories exported.
Giving credit where do, this code originally came from the Niagara Central Community. The post there was for AX only, hard to find and didn’t clearly cover all the steps needed to implement a working object. Hopefully this will clear up the finer details. Tested under AX3.8 & N4.3.
Point to point commissioning (Cx) of a building automation system is key to quality control on any system. This is often overlooked by contractors. Failing to fully test the system results in higher warranty callbacks and customer dissatisfaction all while tarnishing a contractor’s reputation.
Benefits for contractors
Fully documenting the Cx process gives solid warranty date information, helps ease the transfer of projects between techs and provides clear initial system condition for end users that like to “tinker”. Service is much easier if your techs are documenting site conditions in the Cx forms. When the service tech is looking for a problem device later they will be able to find it quickly instead of searching for a long time. Any mechanical/equipment problems will be identified at startup and would prevent warranty callbacks.
Results of failing to 100% test
Benefits for owners
Failure to require your BMS contractor to document point to point Cx potentially leads to years of building issues/failures. Documented Cx doesn’t guarantee a problem-free system but it does set a minimum bar. As an owner spend a little time to verify the dates, it becomes a bigger hassle to fake the forms than completing them. Requiring Cx documentation on bid day is unlikely to add costs to the project. Good contractors will be doing this internally already. Poor contractors will ignore the requirement.
Tools
The link below is a commissioning form for documenting point to point checkout. It supports templates for unitary devices making it easy to generate all the required forms. Scripts automatically create forms for each device and hyperlinks to the index page. All forms can be quickly checked and the status is updated on the index worksheet. When a project passes between techs, this gives clear indication where the project stands.
Typical workflow to implementing Cx forms:
Create templates for each common program or device
Save in a master form and distribute
During startup create forms based on project requirements
Document signal types and pass / fail per point during startup
At final closeout verify forms for completeness
Include in as-built documentation
Macros must be enabled after opening to allow scripts to run. These are well commented and easy to modify.
Ever wonder if its possible to email out histories? Have a Cx agent that wants all the logs of a project? Here is the secret to take multiple Niagara histories and send them as a csv file attachment without any special drivers.
Setting up export tags within the Niagara platform. Complete folder structure, points and histories can be imported automatically saving labor and mistakes over manually importing into the supervisor. This also allows reuse of graphics within the Jace since the structure and naming is duplicated within the supervisor.